
Table of Contents
PPro8 History Log
Use the PPro8 History Log window to look up order activities and trade history.
- Please note that the History Log can no longer be closed due to its importance, much like the Summary Window.
Open the History Log window
1. On the PPro8 toolbar, click HistoryLog.

2. The History Log window appears.

History Log window components
The History Log window contains two sub-tabs: Order Log and Trade List.
Order Log
Use the Order Log window to view the order log for orders placed on the current trade date.
- Right-click anywhere in the Order Log window, whether in the Limit Orders, Activity Log, or Script Orders section. The shortcut menu appears with the following options:
- Copy Cell to Clipboard: copy the content in any cell to clipboard.
- Copy Row to Clipboard: copy the selected row of data to clipboard.
- Order Log Customization Dialog: open the Order Log Customization window.
- Print Activity Log: print the activity log.
- Export Activity Log: export the activity log to CSV file format, which can then be imported in Excel for further review and analysis.
The Order Log window has three components: Limit Orders, Activity Log, and Script Orders.
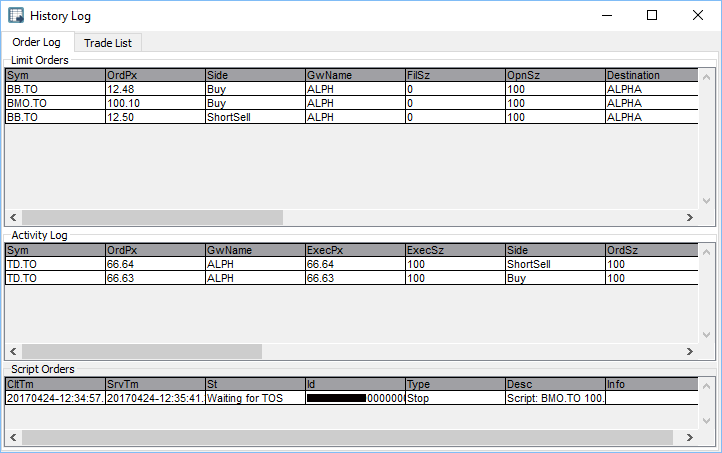
i. Limit Orders: view limit orders pending execution.
- Sym (Symbol): the symbol of the order
- OrdPx (Price Order): the accepted price of the order
- Side (Side Execution): the side of the order—either bid, offer, or short offer
- GwName (Gateway): the gateway where the order was sent
- FilSz (Size Filled): the number of shares the order was filled for
- OpnSz (Size Open): the order size currently accepted on the market
- Destination: the destination for the order
- OrdrSt (State): the current status of the order—accepted, pending, partially filled, or other
- MktTime (Market Time): the local market time when the order was sent
- LstEvnt (Last Event): the last event that happened to the order—accepted, rejected, canceled, or other
- OrdSz (Size Order): the order size sent to the market
- AutoCn (Auto Cancel): you can toggle whether or not to allow autocancel on filled or partially filled orders
- OrdrId (Order ID): the auto-generated order ID that uniquely identifies the order
- Market (Market Name): the name of the market where the order was sent
- ClntTime (Client Time): the time when the order was sent from the client
- Info (Information): other information about the order
- OrdCls (Order Class): the name of the order from Keyboard Setup
- ViaApi (Order sent via API): whether the order was sent via PProAPI—Yes or No
ii. Activity Log: view all order activities (orders sent, filled, partially filled, canceled, or rejected).
- Sym (Symbol): the symbol of the order
- OrdPx (Price Order): the price of the order
- GWName (Gateway): the gateway where the order was sent
- ExecPx (Price Execution): the price at which the order was executed
- ExecSz (Size Execution): the size at which the order was executed
- Side (Side Execution): the side at which the order was executed
- OrdSz (Size Order): the order size on the market
- FilSz (Size Filled): the number of shares the order was filled for
- OpnSz (Size Open): the order size currently accepted on the market
- OrdrSt (State): the state of the order
- LstEvnt (Last Event): the last event that happened to the order—accepted, rejected, canceled, or other
- Destination: the destination for the order
- Market (Market Name): the name of the market for the order
- MktTime (Market Time): the local market time of the order
- ClntTime (Client Time): the time of the order in the client
- OrdrId (Order ID): the auto-generated order ID that uniquely identifies the order
- Info (Information): other information about the order, such as liquidity flags and tags
- OrdCls (Order Class): the name of the order from Keyboard Setup
- ViaApi: ViaApi (Order sent via API): whether the order was sent via PProAPI—Yes or No
iii. Script Orders: view all script order activities.
- CltTime (Client Time): the time of the script order on the client side
- SrvTm (Server Time): the time of the script order at the script server
- St (State): the current status of the script order—accepted, pending, partially filled, or other
- Id (ScriptID): the auto-generated script order ID that uniquely identifies the order
- Type (Script Type): the type of script order—stop, flatten, cancel, or other
- Desc (Description): descriptive information about the script order
- Info (Script Info): other information about the script order, such as whether it ran successfully, or whether the script could not reach the servers due to no connection
- OffId (Office ID): the office ID where the script order originated
Trade List
Use the Trade List window to view trade execution history for the current trade date.

- Sym (Symbol): the symbol of the trade
- ExSide (Side): the side of the trade
- Px (Price): the price of the trade
- Share: the number of shares
- GwName (Gateway): the name of the gateway
- OrdSt (State): the state of the trade
- GwFee (Gateway Fee): the gateway fee
- ActFee (Activity Fee): the activity fee
- ExecFee (Execution Fee): the execution fee
- ClrFee (Clearing Fee): the clearing fee
- Time (Execution Time): the execution time of the trade
- Order# (Order Id): the auto-generated order number that uniquely identifies the trade (same as Order ID)
- LiqFlag (Liquidity Flag): the liquidity flag and tags
- GrossPL (Gross): the gross Profit and Loss
- NetPnL (Net): the net Profit and Loss
- PerPL (Net Per Share): Profit and Loss per share
- RegFee (Regulatory Fees): the regulatory fees
- Mkt (Market): the market
- Rg (Region): the region
- Destination: the destination
- ExDate (Date): the date of execution
- Info (Information): other information about the order, such as liquidity flags and tags
- Cy (Currency): the currency
Note: the foreground and background colors in each row are customizable for all order states: Buy, Sell, Short Sell, Reject, Cancel, and Error.
Note: orders rejected by PPro8 due to pre-trade checks appear as errors.
Use Cancel Replace function
Use this function to maintain your current limit order's price and time priority, while you have an opportunity to reduce its size.
Note: before you can use this function, your order must first be accepted.
1. Click a row in the Limit Orders section to select it, right-click the row to open the shortcut menu, and then click Cancel Replace. Or, click a row, and then press Ctrl + R.
2. The Cancel Replace window appears.
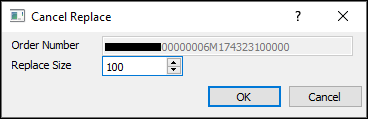
3. Type or click the replace size, and then click OK.
Note: it is only possible to set a smaller replace size (lower number of shares). The order number cannot be edited, and it is not possible to reduce below Lot Size value.
4. The cancel replace order is sent.
Use Cancel and Send New Order function
Use this function to modify all aspects of the order while it loses price and time priority. This creates an entirely new order.
1. Click a row in the Limit Orders section to select it, right-click the row to open the shortcut menu, and then click Cancel and Send New Order. Or, click a row, and then press Ctrl + N.
2. The floating Order Edit Box appears.

Note: the window title includes the symbol name, function (in this case, canceling), and order number for your reference.
3. Type or click the parameters (Gateway, Side, Destination, Order Type, Reference Side, Limit Price, Shares, TIF, Reserve, Display Size, and Minimum Size) you want to set for the new order.
4. Click Execute, or press Enter.
5. The original order is canceled and the new order is sent.
New: the Cancel and Send New Order dialog can use key shave values from Keyboard Setup to increase or decrease price and size. Simply click in the Limit Price or the Shares field, and then press the Up or Down key.
Set AutoCancel options
Use the AutoCancel options to automatically cancel parallel orders on a symbol when the order gets filled.
1. Click a row in the Limit Orders section to select it.
2. Right-click the row to open the shortcut menu.
3. Click Set AutoCancel on Fill to automatically cancel parallel orders on a symbol when the order is filled. Or, click a row, and then press Ctrl + 1.
4. Click Set AutoCancel on PartialFill to automatically cancel parallel orders on a symbol when the order is partially filled. Or, click a row, and then press Ctrl + 2.
5. Click Set AutoCancel off to turn off automatic cancels. Or, click a row, and then press Ctrl + 3.
6. The AutoCancel options are set.
Cancel Accepted Limit Orders
1. Left-click on an order in your Limit Order section, so it is highlighted in grey.
2. Cancel it by clicking the Escape key on your keyboard.
History Log Customization
Order Log Customization
To make changes to the Order Log settings, right-click anywhere in the blank space of the Order Log, and then click Order Log Customization Dialog or press Ctrl + O, to open the Order Log Customization window. This window displays four tabs on the left: Options, Columns, Colors, Fonts, and Sounds.
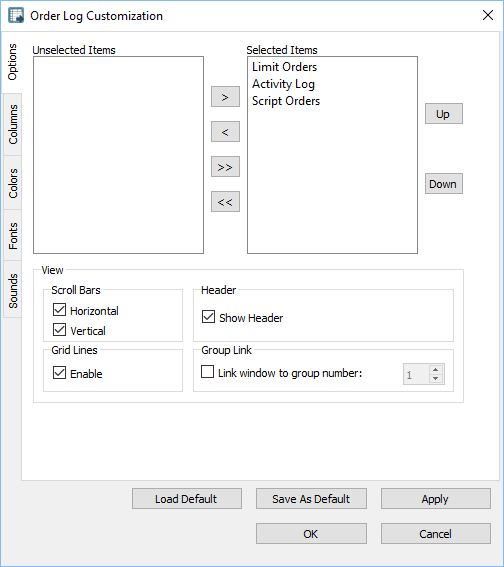
Options
Use the Options window to set the options for the Order Log.
- Click the Options tab to open the Options window.
Hide an item from the Order Log
1. In the Options window, click an item in the Selected items list.
2. Click the left arrow to move the item to the Unselected items list.
3. Click OK.
4. The item is hidden from the Order Log.
Show an item in the Order Log
1. In the Options window, click an item in the Unselected items list.
2. Click the right arrow to move the item to the Selected items list.
3. Click OK.
4. The item appears in the Order Log.
Hide Scroll Bars, Grid Lines, or Header
1. In the Options window, clear the check box(es) for the Scroll Bars, Grid Lines, or Header option.
2. Click OK.
3. The item(s) are hidden from the Order Log.
Show Scroll Bars, Grid Lines, or Header
1. In the Options window, select the check box(es) for the Scroll Bars, Grid Lines, or Header option.
2. Click OK.
3. The item(s) appear in the Order Log.
Link History Log to group number
1. In the Options window, select the check box for the Link window to group number option.
2. In the value field, type or click a number.
3. Click OK.
4. The History Log is linked to a group of windows by number.
Columns
Use the Columns window to manage the columns that appear in the Limit Orders, Activity Log, and Script Order windows.
- Click the Columns tab to open the Columns window.
Limit Orders columns
Use the Limit Orders columns window to set the order in which limit order items appear in the Order Log.
1. Click an item in the Selected items list.
2. Click Up or Down.
3. Click OK.
4. The item is moved in the Limit Orders section.
Activity Log columns
Use the Activity Log columns window to set the order in which activity log items appear in the Order Log.
1. Click an item in the Selected items list.
2. Click Up or Down.
3. Click OK.
4. The item is moved in the Activity Log section.
Script Orders columns
Use the Script Orders columns window to set the order in which script order items appear in the Order Log.
1. Click an item in the Selected Items list.
2. Click Up or Down.
3. Click OK.
4. The item is moved in the Script Orders section.
Colors
Use the Colors window to set the colors for gateways and pending symbols in the Order Log.
- Click the Colors tab to open the Colors window.
Gateway Colors
Use the Gateway Colors section to set the background and foreground colors for the various gateways and order states.
1. In the Colors window, under Gateway Colors, click a gateway.
2. Double-click a color box.
3. The Color Selector window appears. Click a color, and then click OK.
4. The color is set for the gateway and order status.
Partial Fill Colors
- Select the Color Partial Filled check box to color partial fills.
Fonts
Use the Fonts window to set the overall font for the Order Log.
- Click the Fonts tab to open the Fonts window.
Set a font for the Order Log
1. In the Fonts window, click Set Font.
2. The Select Font window appears.
3. Click the font, font styles, size, effects, and writing system you want to set.
4. Click OK.
5. In the Order Log Customization window, click OK.
6. The new font is set.
Sounds
Use the Sounds window to set a sound alert for fills or rejects by symbol.
- Click the Sounds tab to open the SoundsConfiguration window.
Set a sound alert for a symbol
1. In the SoundsConfiguration window, click New.
2. A new row appears.
3. Type a symbol, click a trigger type (On Fill, On Part Fill or Reject), and select a sound file.
Note: to set a sound alert for all symbols, type *.* in the symbol field. To set a sound alert for a market, e.g., Nasdaq, type *.NQ.
4. Click OK.
5. The sound alert for the symbol is set.
Trade List Customization
To make changes to the Trade List settings, right-click anywhere in the blank space of the Trade List, and then click Trade List Customization Dialog or press Ctrl + T, to open the Trade List Customization window. This window displays four tabs on the left: Options, Columns, Colors, and Fonts.
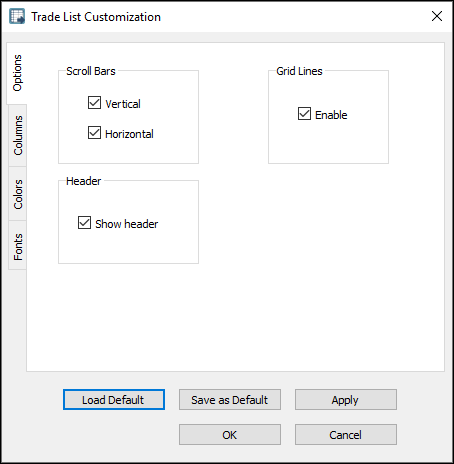
Options
Use the Options window to set the options for the Trade List.
- Click the Options tab to open the Options window.
Hide an item from the Trade List
1. In the Options window, clear the check box for an item that appears in the Trade List.
2. Click OK.
3. The item is hidden from the Trade List.
Show an item in the Trade List
1. In the Options window, select the check box for an item that is hidden from the Trade List.
2. Click OK.
3. The item appears in the Trade List.
Columns
Use the Columns window to manage the columns that appear in the Trade List.
- Click the Columns tab to open the Columns window.
Hide a column from the Trade List
1. Click an item in the Selected items list.
2. Click the left arrow to move the item to the Unselected items list.
3. Click OK.
4. The column is hidden from the Trade List.
Show a column in the Trade List
1. Click an item in the Unselected items list.
2. Click the right arrow to move the item to the Selected items list.
3. The column appears in the Trade List.
Colors
Use the Colors window to set the foreground, background, gridline, and Header colors for the Trade List.
- Click the Colors tab to open the Colors window.
1. In the Colors window, double-click a color box.
2. The Color selector window appears. Click a color, and then click OK.
3. The color for the Trade List is set.
Fonts
Use the Fonts window to set the overall font for the Trade List.
- Click the Fonts tab to open the Fonts window.
Set a font for the Trade List
1. In the Fonts window, click Set Font.
2. The Select Font window appears.
3. Click the font, font styles, size, effects, and writing system you want to set.
4. Click OK.
5. In the Trade List Customization window, click OK.
6. The new font is set.
Alignment Editor and Filter Option
Use the Alignment Editor and Filter Option to align columns to the left, center, or right, and to set a filter for the History Log window.
Align a column and activate a filter in the History Log window
1. Right-click a column heading, such as Symbol, MarketName, PriceOrder, Side, State, SizeOrder, SizeFilled, SizeOpen, Gateway, Destination, AutoCancel, OrderID or ViaApi in the Limit Orders section, or ClientTime, ServerTime, State, ScriptID, or ScriptType in the Script Order section of the History Log window.
2. The Alignment Editor and Filter Option appear.
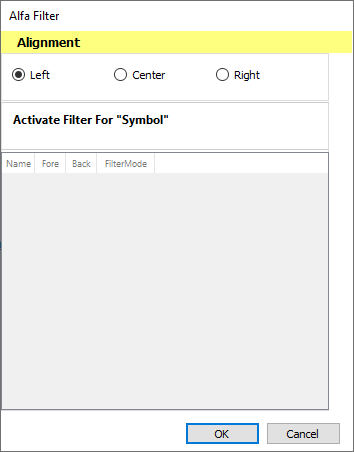
3. In the Alignment section, click Left, Center, or Right to align the column left, center, or right.
4. Click Activate filter for Symbol to set the filter option.
5. Click a filter parameter option, type a value or values, and double-click the color boxes to set colors for the filter.
New: under the FilterMode column in the Alfa window, the following options are available for selection:
- ShowMatchingRowOnly
- HideMatchingRows
- HighlightRowOnly
- HighlightCellOnly
6. Click OK.
7. The column is aligned and the filter is activated for the column.
Order Number Example
Order Numbers provide a series of information, which can be broken down into distinct parts. Please see the below example Order Number:

The distinct parts of the above Order Number provides the following information.
- PPro8 Trader ID.
- Number of logins that day. As the first two digits are “03,” the trader logged in three times for the given trading day in this example.
- Number of trades on this login. The number of trades that have been done on that login number for the given trading day, in this example, two.
- Type of order. “M” in this example, means a manually entered trade.
The following is a list of the various order types:
- M: Manually entered by trader
- O: Overnight loaded on T+1
- R: Flattening by the Risk System
- S: Originated from a Script
- U: Trader Flattening
- V: Head Office Flattening
- W: Manager Flattening
- P: A request to cancel orders