
Table of Contents
PPro8 Chart Window
Use the PPro8 Chart Window tool to display charts that can help with trading decisions.
Open a Chart Window
1. On the PPro8 toolbar, click ChartWindow.

2. An empty Chart Window appears.
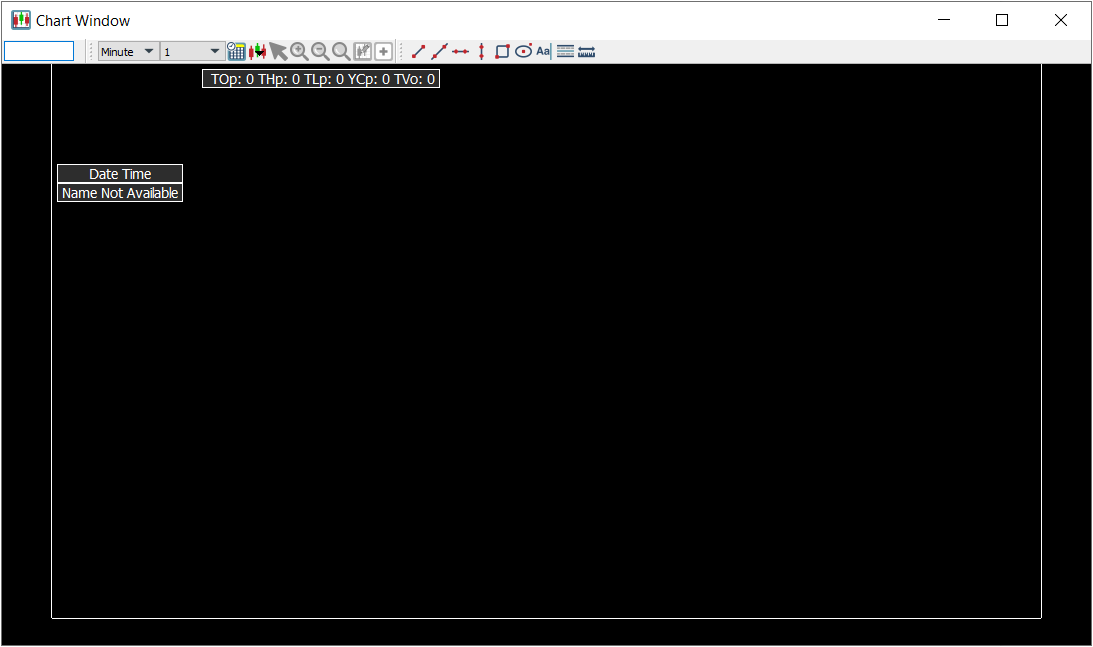
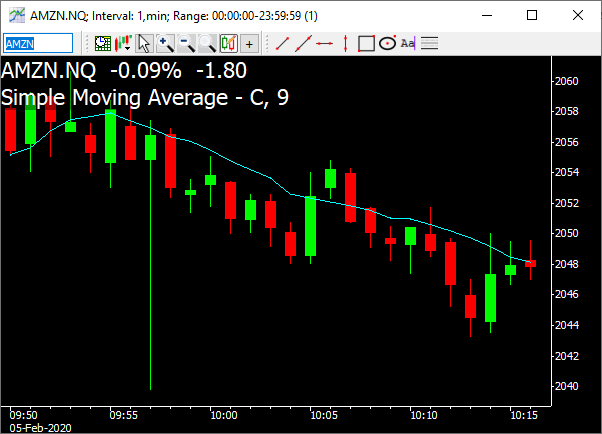
Chart Window components
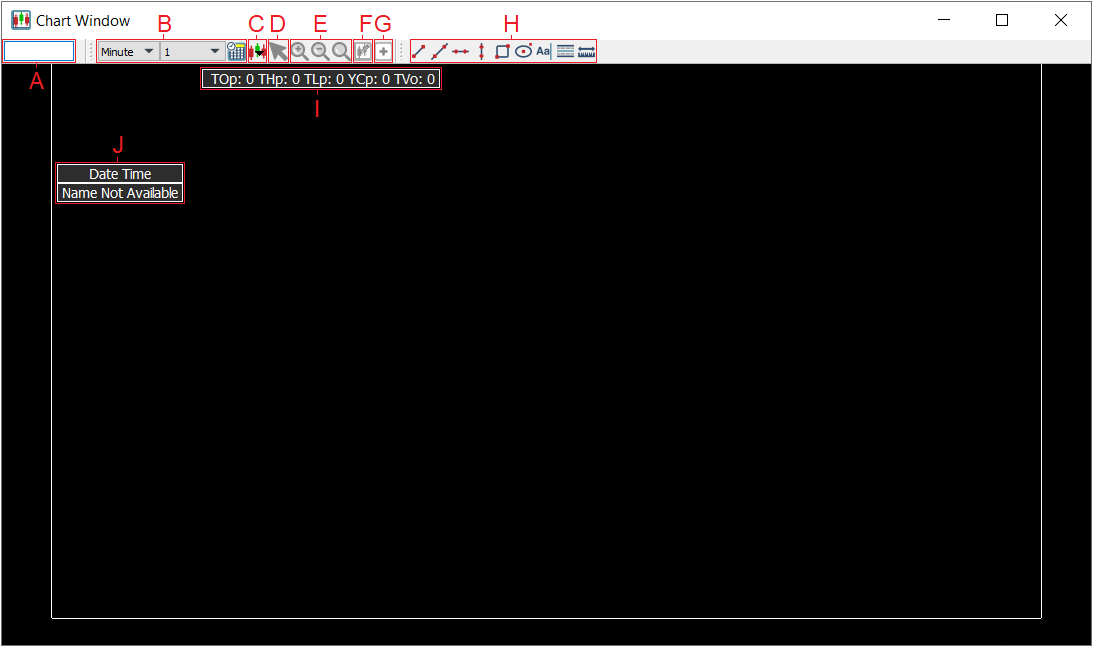
A. Symbol Box: type the symbol (for example, BB), press Tab, click the market extension (for example, TO), and press Enter to load the chart.
B. Time Interval: click to open the Chart Interval window, and type in values to set the time interval.
- Select your value of time and time interval directly from Chart Window.
- Click the clock icon to open the Chart Interval window, and type in values to set the time interval.
Note: Minute and Hour bar charts go back historically for a maximum of 60 days.

C. Chart Type: click the option for the type of chart you want to draw, either Candle Stick, OHLC Bar, or Long/Short Line.
D. Cursor button: click either NormalMouseMode or CrossCursor to either add or remove a coordinate system to the cursor to help read time and price information.
E. Zoom In/Zoom Out/Zoom Reset: click the appropriate button to zoom in or zoom out and view a specific interval movement. Zoom can also be achieved by using Ctrl + Mouse Wheel Up/Down.
F. Data Editor: manually change the data that displays in the Chart Window. When a bad print appears in the Time of Sales window, it triggers a visible, incorrect change in price or volume in the Chart Window for a specific minute. You can set the Cursor to CrossCursor to identify the minute when there is a bar that needs to change. To make this change, open the Data Editor, type the correct value, click OK, and the Chart Window updates.
G. Add Symbol: click to open the Chart Window Customization: Multiple Symbols view, where you can add or remove multiple symbols for comparison in the Chart Window.
H. Drawing Tools: use the drawing tools to draw elements like lines and shapes, and to add text notes, as follows:
- click DrawSegmentedLine to draw a segmented line
- click DrawExtendedLine to draw an extended line
- click DrawHorizontalLine to draw a horizontal line
- click DrawVerticalLine to draw a vertical line
- click Draw Polygon to draw a polygon
- click Draw Ellipse to draw an ellipse
- click InsertText, and then type to insert text
- click Draw Fibonacci Retracement to draw Fibonacci retracement lines
- to edit a drawing element, right-click it, point to the element name (for example, Ellipse), point to Edit, and then select editing options
- to move a drawing element, Ctrl + click it and drag it
- to delete a drawing element, right-click it, point to the element name, and then click Remove
- to save lines, drawings, and text elements to the Chart Window, click the Save Layout button
 on the PPro8 toolbar; this will keep your drawn elements displayed in that particular Chart Window instance, even when you switch to view other stocks
- click Draw Measuring Shape to draw a rectangle
Note: These tools will only display lines of the same time unit that they are created in e.g. any mark(s) created while using minute as the unit of time will not display when you shift your unit of time to to hour, day etc. You can change the time unit by accessing the Chart Interval window.
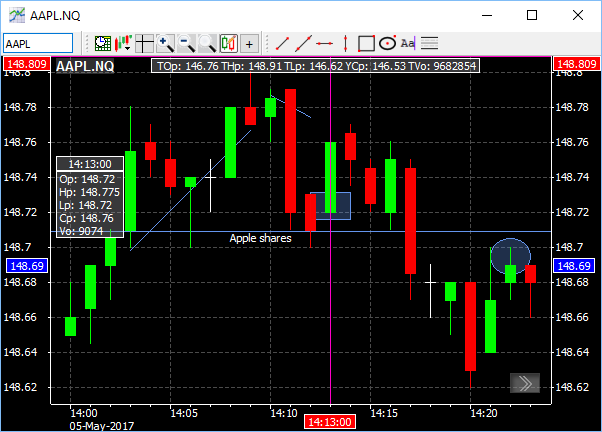
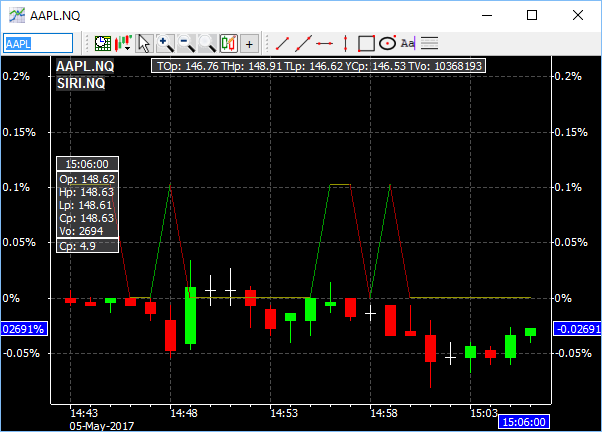
I. OHLC Titlebar: view daily values, including opening price, high price, low price, yesterday's closing price, and volume.
J. OHLC Info: view the symbol’s Open Price, High Price, Low Price, and Closing Price, as well as Volume, for the trading day.
Add a symbol to an existing symbol list
You can use Chart Window to add a currently registered symbol to an existing symbol list. This new feature integrates seamlessly with the Symbol List Editor tool, as well as Stock Window, Time of Sales, and Summary.
1. Right-click anywhere in the Chart Window to open the context menu.
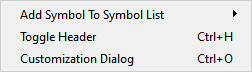
2. Point to the Add Symbol to Symbol List menu item.

3. The Currently Selected Symbol List view appears. Click [Select A List] to choose the symbol list where you want to add the current symbol, and then click the Add Symbol button.
4. The symbol is added to the symbol list.
5. To remove a symbol from the list, you will need to open the Symbol List Editor tool and delete it there. For more information, you can read the Symbol List Editor manual.
Send order from Chart Window
You can send orders when Chart Window is open and on Top. To use this function, enable the Order Edit Box feature in Customization, and then follow these steps.
1. Set up keyboard shortcuts with Keyboard Setup.
2. Open a new Chart Window.
3. Type the symbol and market extension, and then press Enter.
4. Type a keyboard shortcut.
5. The order edit box appears.
6. Edit the order (type values in the Limit Price and Shares fields as needed), and then press Enter to execute.
7. The order is sent from the Chart Window.
Note: click SaveLayout on the PPro8 toolbar to make the order edit box remember its position on the screen when re-opened again.
Chart Window Customization
To make changes to the Chart Window settings, right-click anywhere in the Chart Window, and then click the Customization Dialog menu item to open the Chart Window Customization window. This window displays three main tabs on the left: Display, Indicators, and Multiple Symbols.
Note: a symbol must be loaded in the Chart Window before you can open Customization.

Adding & Moving Text
You can add notes and text to your chart window by clicking ![]() from the menu bar. This text can be placed anywhere, and moved by holding Control, selecting any text box with your cursor, and repositioning it as desired.
from the menu bar. This text can be placed anywhere, and moved by holding Control, selecting any text box with your cursor, and repositioning it as desired.
Autcomplete
This feature allows PPro8 to provide a list of available symbols starting with a certain string pattern after you have entered at least one character into the Chart Window.
1. Right click on the Chart Window, and select “Customization Dialog.”

2. Select the “Display” tab in the left hand menu and select the “MenuBar” tab at the bottom.

3. Ensure that “Autocomplete Symbol” is in the “Selected Items” column. If it’s placed in the Unselected Items, then please select “Autocomplete Symbol” and then press then press “>” to move the item.

4. Next, press “Apply” and then “OK.”
5. Once completed you will see a new button in the Chart Window called “Autocomplete Symbol.”

6. Press this button once to enable this option. Press it again to disable this option.
Display
Use the Display window to adjust the display settings for the Chart Window.
- Click the Display tab to open the Display window.
The Display window contains five sub-tabs: Common Settings, Font, Menu Bars, Chart Data, and Size.
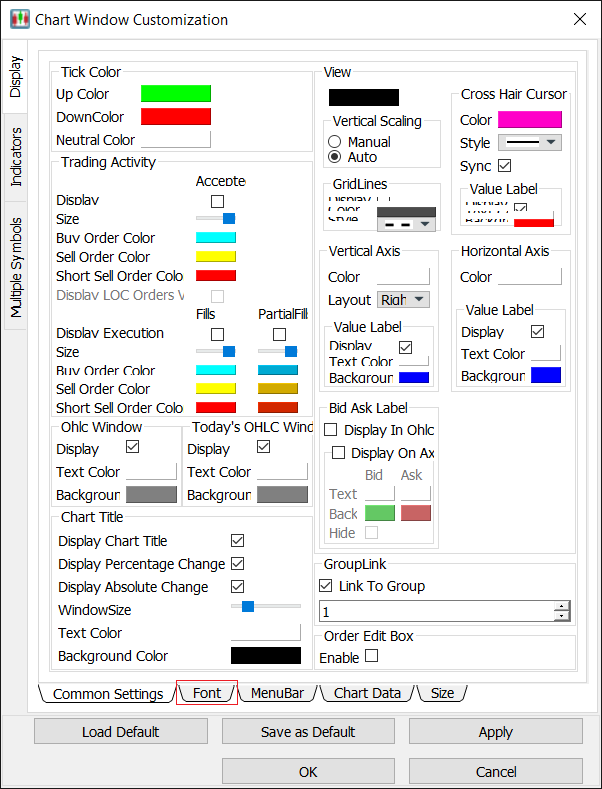
Common Settings
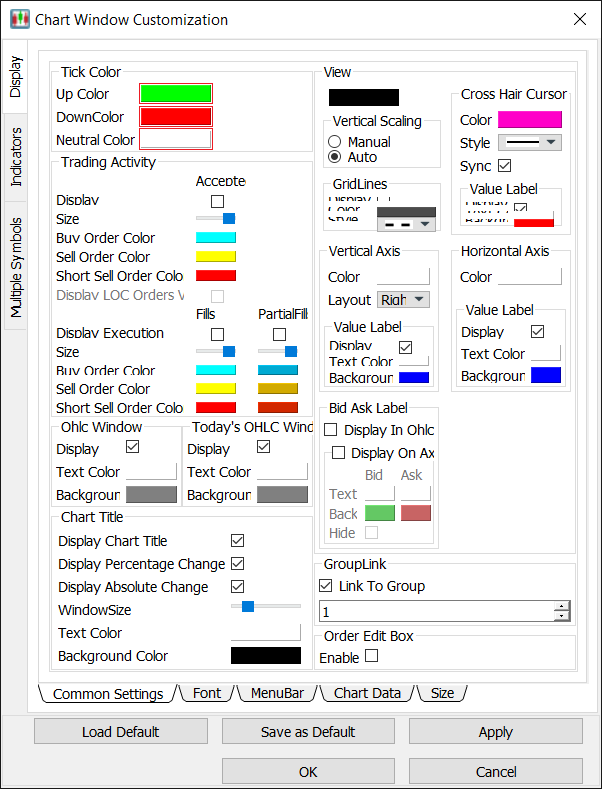
Use the Common Settings window to adjust color and layout settings for the Chart Window.
1. Click the Common Settings sub-tab in the Display window.
2. The Common Settings window appears.
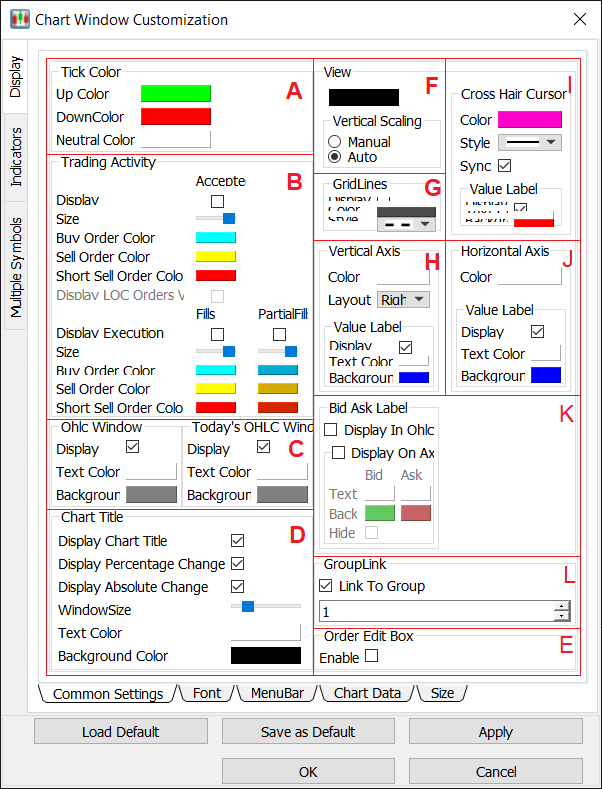
A. Set tick color
1. In the Common Settings window, double-click the color box for either of the three options (Up Color, Down Color, or Neutral Color).
2. The Color Selector window appears. Click a color, and then click OK.
3. In the Customization window, click OK.
4. The tick color is set.
B. Adjust trading activity mark settings
1. In the Common Settings window, select or clear the check boxes for the Display and the Display Execution options to hide or display them.
2. Double-click the color box for either of the three color options (Buy Order Color, Sell Order Color, or Short Sell Order Color).
3. The Color Selector window appears. Click a color, and then click OK.
4. In the Customization window, click OK.
5. The trading activity mark options are set.
C. Display or hide the OHLC Window
- Select or clear the check box for the Ohlc Window display option to show or hide the OHLC Window.
- To change the text colour, please press on the colour swatch next to “Text” and select your preferred colour
- To change the background colour, please press on the colour swatch next to “Background” and select your preferred colour.
D. Adjust Chart Title settings
1. In the ChartTitle section, select or clear the check box for the Display Chart Window, the Display Percentage Change, or the Display Absolute Change option to show or hide the title of the chart (i.e., the symbol name), the percentage change in price, or the absolute change in price.
2. Move the WindowSize slider to the left or to the right to adjust the size of the chart title.
3. Double-click the color box for either of the two color options (Text Color or Background Color).
4. The Color Selector window appears. Click a color, and then click OK.
5. In the Customization window, click OK.
6. The chart title options are set.
E. Enable or disable the Order Edit Box
- Select or clear the check box for the Enable option to enable or disable the Order Edit Box feature in the Chart Window.
Adjust View settings
F. Set Chart Window background color
1. In the View section, double-click the color box for Background color.
2. The Color Selector window appears. Click a color, and then click OK.
3. In the Customization window, click OK.
4. The background color is set.
F. Set Vertical Scaling
1. In the Vertical Scaling section, click the Manual or Auto option to set vertical scaling to manual or automatic.
2. In the Customization window, click OK.
3. The vertical scaling is set. When vertical scaling is set to manual, clicking and dragging the vertical axis up or down changes the scale.
G. Set Grid Lines
1. In the GridLines section, select or clear the Display check box to show or hide grid lines.
2. Double-click the color box, click a color, and then click OK.
3. Click the grid style you want to set in the Style menu.
4. In the Customization window, click OK.
5. The grid lines are set.
H. Set Vertical Axis
1. In the Vertical Axis section, double-click the color box, click a color, and then click OK.
2. In the Layout menu, click Left, Right, or Both.
3. In the Value Label subsection,
- select or clear the Display check box to show or hide the value label;
- double-click the color box for Text Color, click a color, and then click OK;
- double-click the color box for Background Color, click a color, and then click OK.
4. In the Customization window, click OK.
5. The vertical axis is set.
I. Set Cross Hair Cursor
1. In the Cross Hair Cursor section,
- double-click the Color box, click a color, and then click OK;
- click the cross hair cursor style you want to set in the Style menu;
- select or clear the Sync on View check box to sync or unsync.
2. In the Value Label subsection,
- select or clear the Display check box to show or hide the value label;
- double-click the color box for Text Color, click a color, and then click OK;
- double-click the color box for Background Color, click a color, and then click OK.
3. In the Customization window, click OK.
4. The cross hair cursor is set.
J. Set Horizontal Axis
1. In the Horizontal Axis section, double-click the color box, click a color, and then click OK.
2. In the Value Label subsection,
- select or clear the Display check box to show or hide the value label;
- double-click the color box for Text Color, click a color, and then click OK;
- double-click the color box for Background Color, click a color, and then click OK.
3. In the Customization window, click OK.
4. The horizontal axis is set.
K. Adjust BidAsk Label settings
- Select or clear the DisplayInOhlcWindow check box to show or hide the BidAsk label in the OHLC window
- Select or clear the DisplayOnAxis check box to show or hide the BidAsk label on the vertical axis of the chart
L. Link Chart Window to a group
- If this option is selected, the Chart Window is grouped by number with other tools, such as the Stock Window and the TOS Window. Other windows in the window group of the same number change their symbol to correspond to the symbol in the Chart Window.
- New: managers, you can now link the Chart Window to Summary to see trading activity for your traders
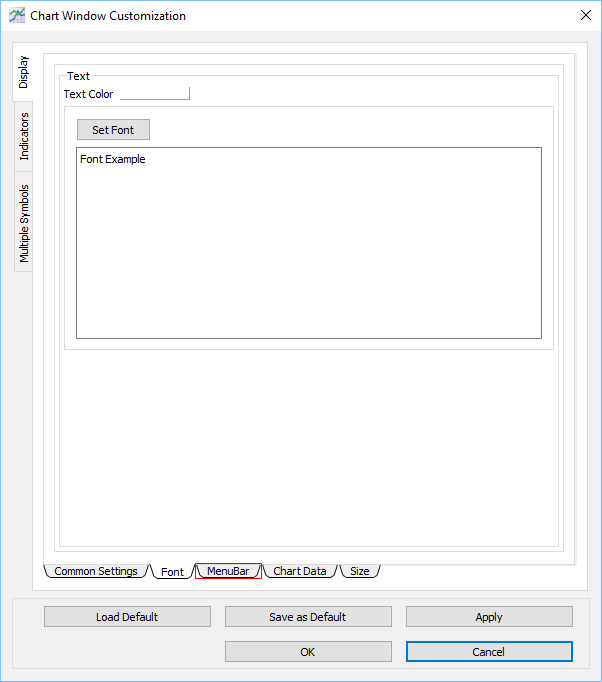
Font
Use the Font window to set the overall font for the Chart Window.
1. Click the Font sub-tab.
2. The Font window appears.

Set a font for the Chart Window
1. In the Font window, double-click the color box for Text Color, click a color, and then click OK.
2. Click Set Font….
3. The Select Font window appears.
4. Click the font, font style, size, effects, and writing system you want to set.
5. Click OK.
6. In the Customization window, click OK.
7. The font is set.
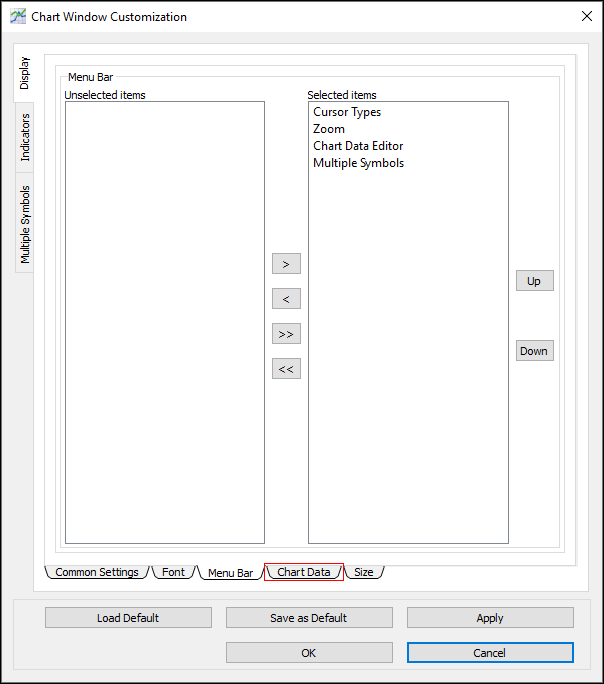
Menu Bar
Use the Menu Bar window to show or hide icons from the menu bar in the Chart Window.
1. Click the Menu Bar sub-tab.
2. The Menu Bar window appears.

Show an item in the Chart Window
1. In the Menu Bar window, click an item in the Unselected items window.
2. Click the right arrow to move the item to the Selected items list.
3. In the Customization window, click OK.
4. The item appears in the Chart Window.
Hide an item from the Chart Window
1. In the Menu Bar window, click an item in the Selected items list.
2. Click the left arrow to move the item to the Unselected items list.
3. In the Customization window, click OK.
4. The item is hidden from the Chart Window.
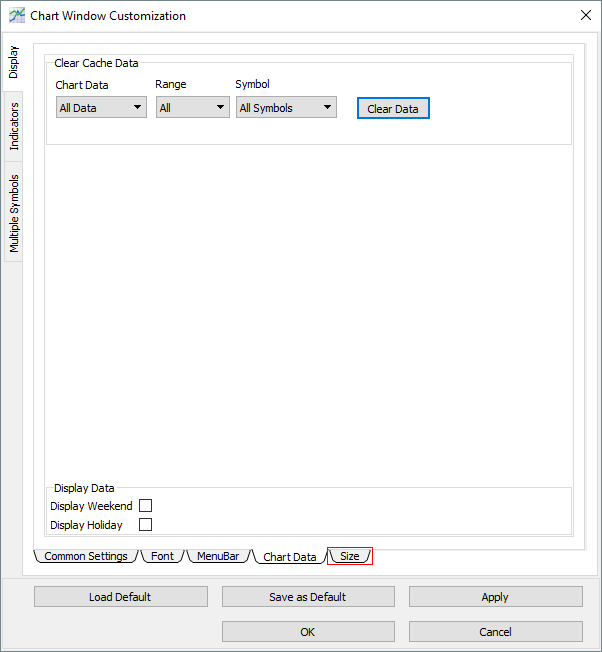
Chart Data
Use the Chart Data window to clear data from the Chart Window, and to hide or display weekend and holiday data.
1. Click the Chart Data sub-tab.
2. The Chart Data window appears.
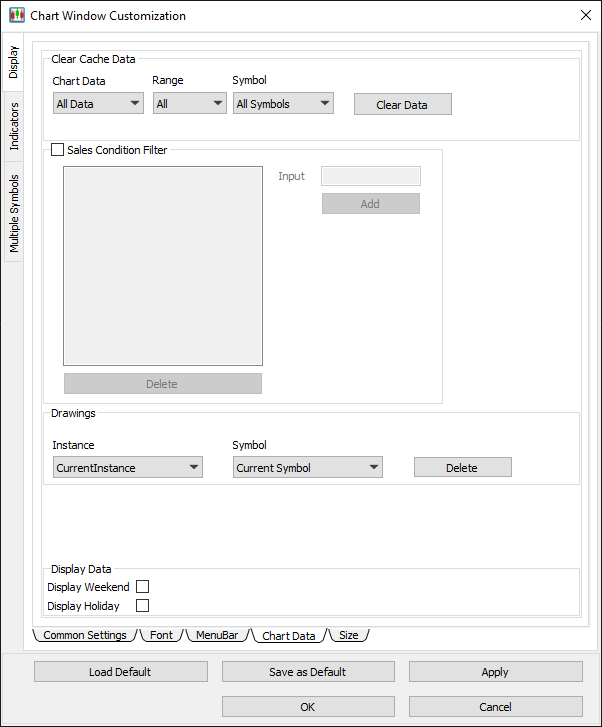
Clear cache data
1. In the Chart Data window, click the Chart Data menu, and then click an option (either All Data, Minute Data, or Day Data).
2. Click the Range menu, and then click All or Today.
3. Click the Symbol menu, and then click All Symbols or Current Symbol.
4. Click Clear Data.
5. The cache data is cleared.
Set a sales condition filter
1. In the Chart Data window, select the check box for Sales Condition Filter.
2. In the Input field, type a sales condition value, and then click Add.
Note: you can find available sales condition values in the TOS Values PDF on the Knowledge Base.
3. Click OK.
4. The filter is applied to the Chart Window, and the sales condition is hidden from view.
5. To remove a sales condition filter, in the Chart Data window, click the filter to select it, click Delete, and then click OK.
Drawings
Using these menus you can delete all drawings created using the Drawing Tool for your Current Instance or All Instances for the Current Symbol or All Symbols.
Show or hide weekend and holiday data
1. In the Chart Data window, select or clear the checkboxes for the Display Weekend and the Display Holiday options to show or hide weekend and holiday data in the Chart Window.
2. In the Customization window, click OK.
3. The chart data is updated.
Size
Use the Size window to configure default shares, maximum position, maximum order size, lot size overrides, and multipliers. Changes made to the Size table can be broadcast to all instances.
1. Click the Size sub-tab.
2. The Size window appears.

Apply size defaults by symbol
1. Ensure that the ApplySizeDefaultsBy option is set to Symbol.
2. Click the New button.
3. The AddNewSizeDefaultsBySymbol window appears.
4. Type the corresponding values in the EnterSymbolOrWildcard, DefaultShareSize, MaxOrderSize, MaxPositionSize, and DefaultLotSize fields.
5. Click OK.
6. The row is added to the table.
7. Continue adding symbols as needed.
8. In the Size window, click OK.
9. The size defaults are set for the symbol(s) when sending orders from the Chart Window.
Apply size defaults by window
1. Ensure that the ApplySizeDefaultsBy option is set to Window.
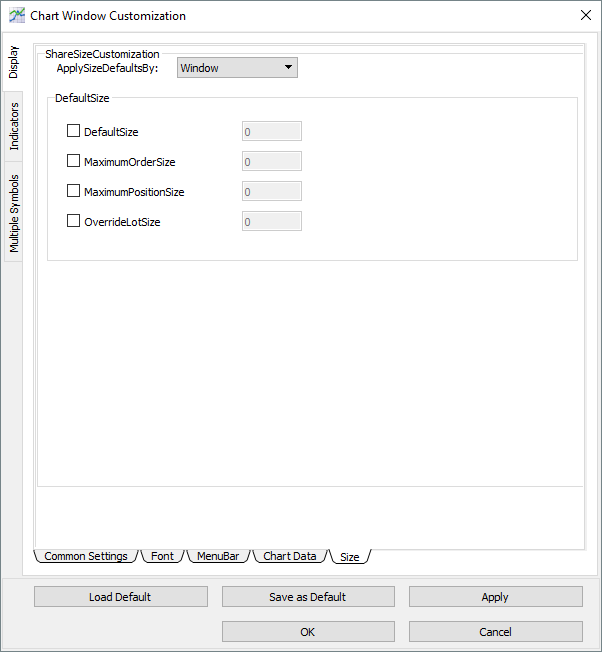
2. In the DefaultSize section, select or clear the check boxes and type values in the DefaultSize, MaximumOrderSize, MaximumPositionSize, and OverrideLotSize fields.
3. Click OK.
4. The size defaults are set when sending orders from the Chart Window.
Editing A Candle
1. Right-click any candle from the Chart Window.
2. Select “Data Editor for One Candle” from the dropdown menu.

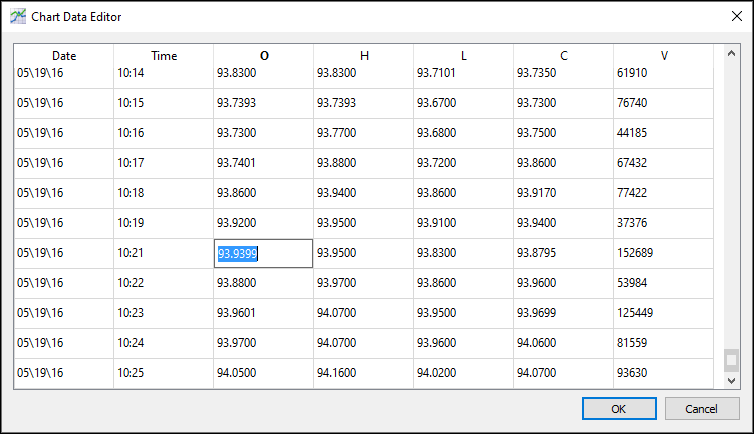
3. The Chart Data Editor will appear where you can edit the data.

4. After entering the desired edits, press “OK.”
- Note: You can only edit one candle at a time using this feature. To edit multiple candles, please use the Data Editor. You can find more information on the Data Editor by reviewing the “Chart Window components.”
Indicators
Use the Indicators window to adjust the indicator settings for the Chart Window.
- Click the Indicators tab to open the Indicators window.
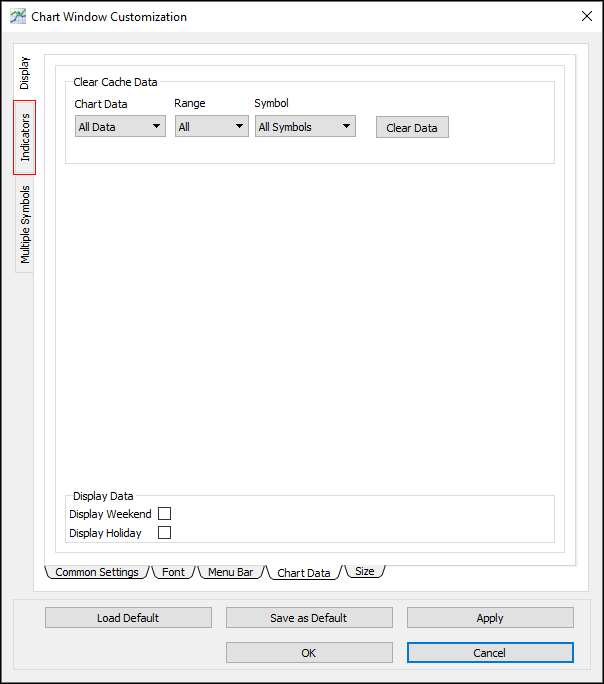
The Indicators window contains one sub-tab: Technical Indicators.
PPro8 Available Indicators
New: for your reference, please see the PPro8 Available Indicators PDF before adding indicators to the Chart Window. Indicators available in PPro8 include:
- Accumulation Distribution Line (ACL)
- Bolling Bands
- Bollinger Bandwidth
- Commodity Channel Index (CCI)
- Exponential Moving Average (EMA)
- Kurtosis
- Moving Average Convergence Divergence (MACD)
- Parabolic SAR
- Parabolic SAR Oscillator
- Relative Strength Index (RSI)
- Simple Moving Average (SMA)
- Skewness
- Smoothed Moving Average (SMA)
- Standard Deviation (SD)
- Standard Error (SE)
- Stochastic
- Stochastic RSI
- Volume
- Volume Weighted Average Price (VWAP)
- Volume Weighted Average Price Bands
- Weighted Moving Average (WMA)
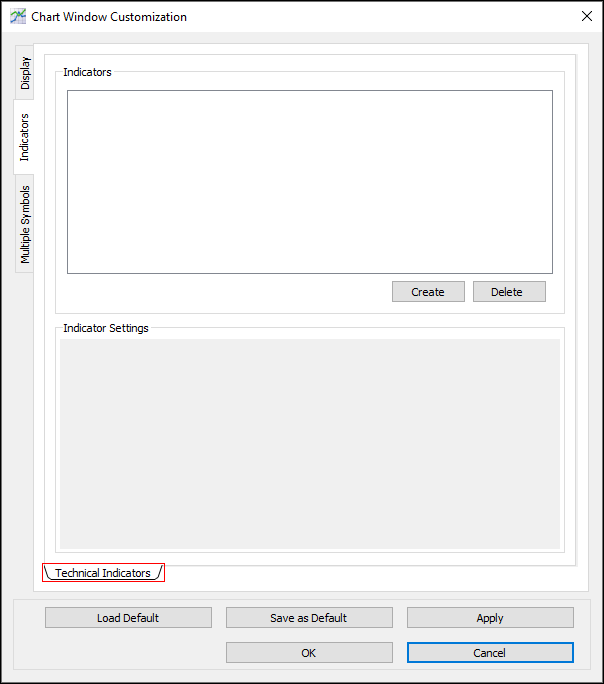
Technical Indicators
Use the Technical Indicators window to create, adjust, or delete technical indicators for the Chart Window.
Create a technical indicator
1. In the Technical Indicators window, click Create.
2. The Create New Indicator window appears.
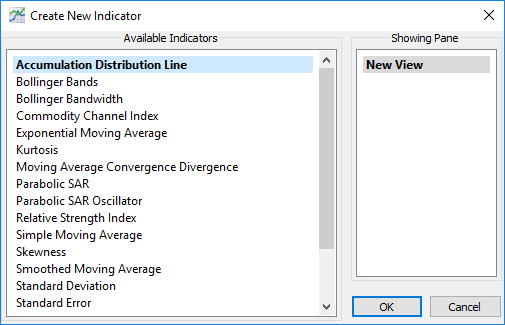
3. Click an indicator in the Available Indicators list.
4. Click OK.
5. The indicator appears in the Indicators section.
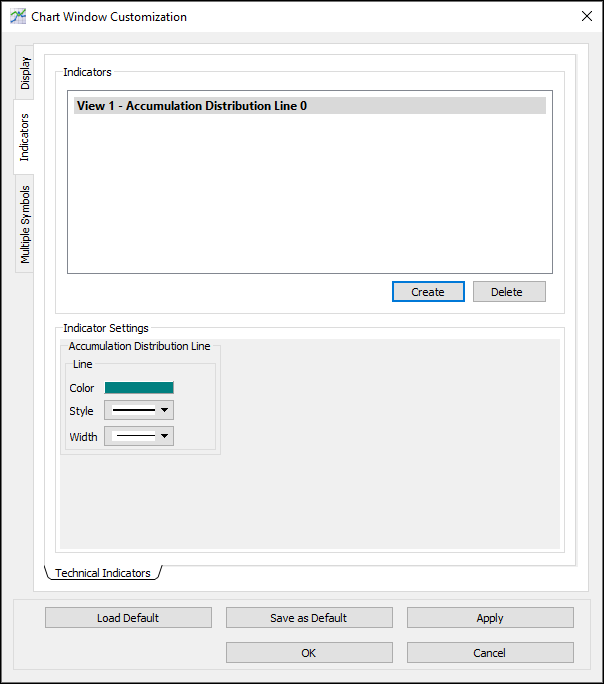
5. In the Indicator Settings section, type or click to adjust the indicator’s settings.
6. Click OK.
7. The indicator appears in the Chart Window.
Note: when setting up an indicator, you need to choose the View 0 option if you want to put the indicator on the chart itself, instead of below it.
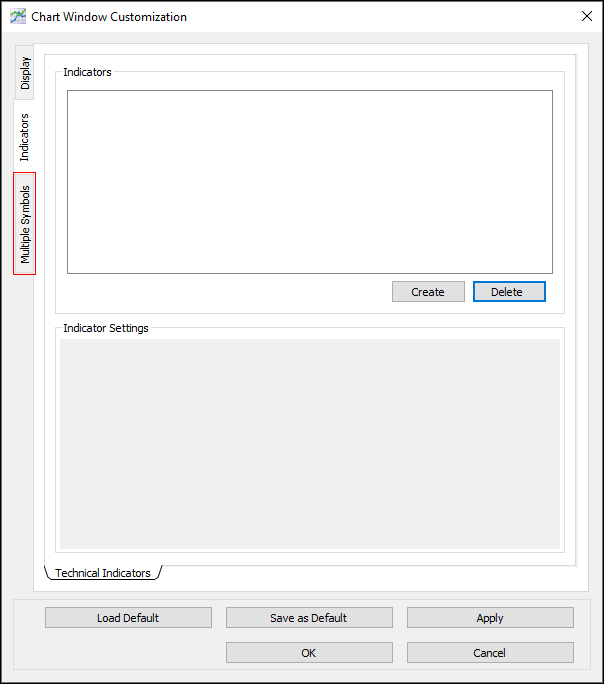
Multiple Symbols
Use the Multiple Symbols window to add, remove, and compare multiple symbols from the Chart Window.
- Click the Multiple Symbols tab to open the Multiple Symbols window.
The Multiple Symbols window contains one sub-tab: Side by Side.
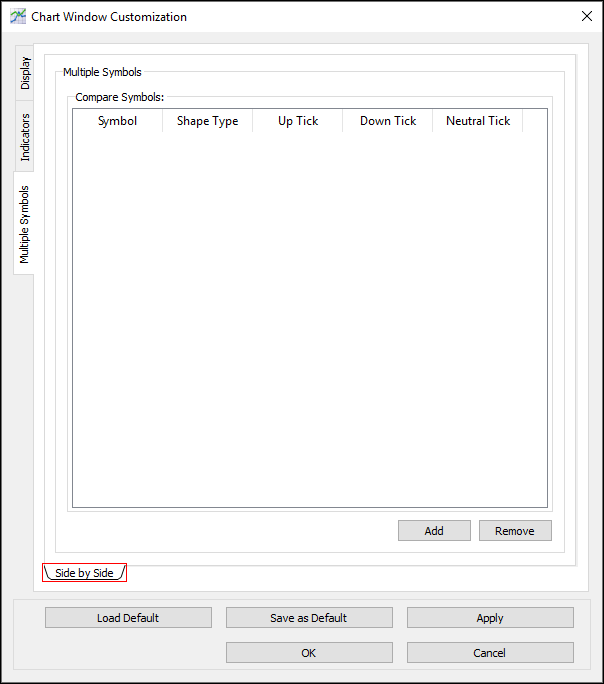
Side by Side
Use the Side by Side window to compare symbols, side by side, in the Chart Window.
Add a symbol for comparison
1. In the Side by Side window, click Add.
2. A row appears in the Compare Symbols table.
3. Double-click each cell in the row and type or click the symbol, shape type, up tick color, down tick color, and neutral tick color you want to set.
4. Click OK.
5. The symbol is added to the Chart Window for comparison.
Delete a symbol from comparison
1. In the Multiple Symbols window, click the row for the symbol you want to delete.
2. Click Remove.
3. Click OK.
4. The symbol is deleted from comparison in the Chart Window.
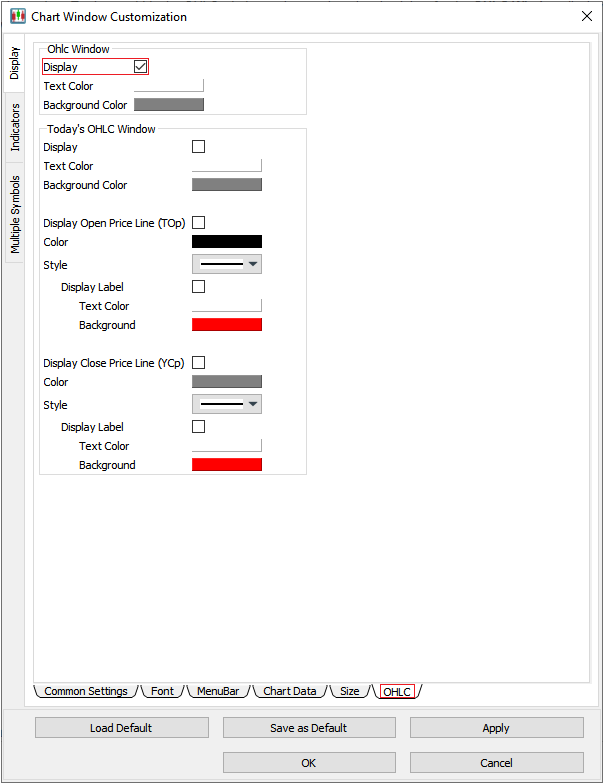
OHLC
Use the OHLC window to show OHLC values for daily and time-specific values. The OHLC title bar shows daily values, and the OHLC window shows data points. In addition you can set lines to show the opening and closing price.
To show, hide or edit the OHLC window or price lines, select or clear the check box for the OHLC Window display option in: Chart Window Customization > Display > OHLC Tab.
Use the OHLC window to view the last data point (candle) values, or any data point highlighted by the crosshair, including:
- TOp = Today’s Opening price
- THp = Today’s High price
- TLp = Today’s Low price
- YCp = Yesterday’s Closing price
- TVo = Today’s Volume
Example
Below you can see an example of OHLC window, set to yellow.

OHLC Title Bar
This setting will show the OHLC window with today’s information. To turn it on, take the following steps.
Turn On
1. Go to the Chart Window Customization, and then select the OHLC Tab.
2. Under Today’s OHLC Window, check Display.

3. Select Apply then OK.
You also have the ability to change the text color and background color. To change these characteristics, simply select a text and background color from the color pickers.

Turn Off
1. Go to the Chart Window Customization, and then select the OHLC Tab.
2. Under Today’s OHLC Window, uncheck Display.
3. Select Apply then OK.
Use the OHLC title bar to view daily values, including:
- TOp = Today’s Opening price
- THp = Today’s High price
- TLp = Today’s Low price
- YCp = Yesterday’s Closing price
- TVo = Today’s Volume
Example
Below you can see an example of OHLC title bar, set to blue.

Opening Price
This setting will show the opening price for the current trade day. To turn it on, take the following steps:
Turn On:
- Go to the Chart Window Customization, and then select the OHLC Tab.
- Check the Open Price Line checkbox.
- Select Apply then OK.

Line Options
You also have the ability to change the color and style of the line. To change the color, simply select a color from the color picker.

To change the line style simply select the style you would like from the drop down menu. The options are:.
- Solid Line
- Dashed Line
- Dotted Line

Display Label
In addition to the line, you can also display a label that provides this information. To turn it on, simply select the Display Label checkbox. You can style by selecting text and background color.

Turn Off
- Go to the Chart Window Customization, and then select the OHLC Tab.
- Deselect Open Price Line checkbox.
- Select Apply then OK.
Example
Below you can see an example of a Open Price line that has been set to green, using a solid line, with a Display Label that uses black text and green background.

Closing Price
This setting will show the closing price for the current trade day. To turn it on, take the following steps:
Turn On:
- Go to the Chart Window Customization, and then select the OHLC Tab.
- Check the Close Price Line checkbox.
- Select Apply then OK.

Line Options
You also have the ability to change the color and style of the line. To change the color, simply select a color from the color picker.

To change the line style simply select the style you would like from the drop down menu. The options are:.
- Solid Line
- Dashed Line
- Dotted Line

Display Label
In addition to the line, you can also display a label that provides this information. To turn it on, simply select the Display Label checkbox. You can style by selecting text and background color.

Turn Off
- Go to the Chart Window Customization, and then select the OHLC Tab.
- Deselect Close Price Line checkbox.
- Select Apply then OK.
Example
Below you can see an example of a Closing Price line that has been set to pink, using a solid line, with a Display Label that uses black text and green background.

Clear Cache Data from Chart Window
A common trigger for the Chart Window crashing is that the locally cached data is corrupted.
To clear all Cache Data from the Chart Window, please take the following steps:
- Right click on the chart window to and select Chart Window Customization
- Navigate to the Display: Chart Data tab
- At the top of the dialogue select the Clear Data button - leaving the settings at the defaults for All Data, All, All Symbols.
- Close the customization by hitting OK.
